 |
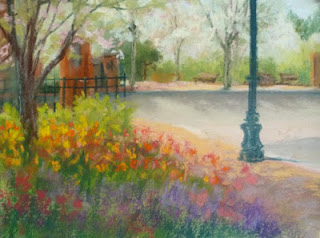
| The Deer Place - 6th painting, on brown Colourfix paper, 9x12" |
Painting outdoors could be fun and easy if you have the right set up and are prepared. With practice, you learn to think on the spot. Very fast you learn to determine what the best composition is, how you are going to handle the masses and the values in the painting, and even where to place your set up. In addition, you learn to foresee the possible questions that passers-by might ask you, so you have an answer ready.
This year a friend and I have formed a plein air group of sorts. There are 6 of us now, and we have been painting at least once a week in the last month. I'm very happy at the level of commitment we all seem to have.
I'm going to share with you my failures (because that's how it started), and successes of what I have painted on location so far this year.
First One:
There is no doubt that one gets rusty during the winter months! I really forced myself to paint outdoors and not wanting to go far I decided our orchard was a good place to start. However, for a first attempt, the scene was too complicated and the sun was in front of me. A simplified version or a close up of the flowers would have been better.
 | |||
| 1st One on La Carte paper |
This one was painted with the group at Franklin Square. Nice, encouraging atmosphere and wonderful colors. While painting I felt I was nailing the scene down. Back home I was so disheartened! Could it be that I was painting under too strong a shade? Maybe with some work I could fix it. Or...I could use this as a reference for a larger scene. Well, not all effort is wasted as I really enjoyed that day.
 |
| 2nd One at Franklin Square, Colourfix paper |
3rd One
This one was done at the Green Bridge, Old Forge, close to noon time with my friend Joann and a friend of hers. The bottom version is how I fixed it back in the studio. I'm still not happy with the tall tree on the right. Wallis board 12x9"

 |
| By the Green Bridge, 12 x9" Wallis board |
4th One
These two were done at Labrador Pond with the group. There were so many beautiful scenes but there was vegetation obstructing the view. It was cloudy but peaceful and the birds were singing.


5th One
At Green Lakes State Park with the group. There were too many choices to paint but not one of them struck me as great, so I settled for this location under the shade. I consider it "a painting for the sake of painting."
 |
| Poison Ivy, Ampersand Pastelbord 12 x 9" |
6th One:
It's the one on top, and also from Green Lakes State Park. I fell in love with the place the first time I saw it when the group went scouting for other areas to paint. While painting it, the small bush on the right started to get more and more important with the light hitting just the top.
Here is a pic of my set up, the Art Attack3, which unfortunately is not manufactured any longer by Willow Wisp Farms.

If this post encourages you to paint outdoors, I've done my work!


